Quantcast
Channel: Painting My World
Viewing all 2266 articles
Browse latest View live

Plein Air Lite: How to Pack Art Supplies for Vacation

$
0
0
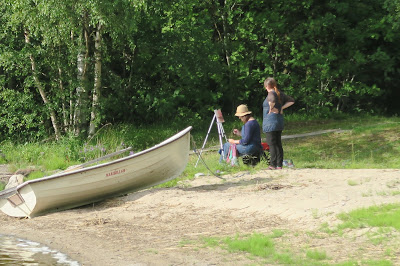
'The Perfect View'               5x7       plein air pastel             ©Karen Margulis
click here to purchase $50
I really don't unpack my suitcase. I do take out my clothes but all of the other travel supplies....including my art supplies stay packed and ready to go at a moments notice.  Next Friday I leave for my final adventure of summer.....a Caribbean cruise with my mom and sister. My sister won a free cruise and we are able to join her for the cost of the tax. I can't afford to stay home for that!

If you have followed my blog then you probably know I have made it a priority to downsize my pastel supplies for traveling. I have been through so many boxes and bags and easels that I have lost track. I have come to the conclusion that there is no one size fits all solution for plein air set ups and supplies. Every trip is different. Some trips are not even dedicated painting trips so how do we decide what to bring?

No matter what the purpose of a vacation or trip it pays to keep your supplies light and simple. I call it Plein Air Lite.

Here are some photos of what I am bringing on this cruise. I want to do some sketching/journaling as well as paint some pastel minis.

My pastels supplies
I am bringing a Heilman single sketchbox (Love!) I will be able to paint some 5x7s as well as my minis (2.5 x 3.5) Everything fits into a soft sided lunch box. I have a 5x7 portfolio book filled with paper which doubles as a finished painting holder, a piece of foamcore backing board, baby wipes, a washcloth to protect my painting surface and some mini Bankers's clips to clip my paper to the board.

The small zippered pouch on the right hold the precut paper for my mini paintings and an extra packet of wipes.


The Heilman box along with wipes, towel, backing board and paper/holder  fit in the lunchbox
Along with the pastels I am bringing a small sketchbook and watercolor postcards. I have a set of Caran d'ache watercolor pencils and a water brush as well as some black pens (Le Pen). A cruise ship is a wonderful place for sketching....especially sketching the figure!


The lunchbox with pastels and the zippered pouches all fit nicely in my backpack. I also have room for some art books and magazines. I have all of the supplies I need for a creative and relaxing....and LITE vacation. I can easily throw one of these items into my beach bag when heading to port or a nearby deck chair!


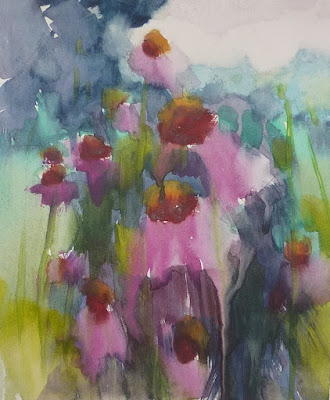
 Today's paintings are plein air studies done on a previous Caribbean cruise. They are done on the upper decks of the ship while sitting in a lounge chair! (available $50 each in my etsy shop)

If this sounds like a good way to paint and relax then consider joining me on my Caribbean Art Cruise in February. There a still a few spots available! Read more about the cruise here.http://www.kemstudios.blogspot.com/2015/07/how-to-practice-art-and-art-of.html


The Secret for Success on Canson Paper

$
0
0

'The Secret Garden'            12x16            pastel             ©Karen Margulis
painting available on Etsy $165
I began my pastel journey with Canson. Like many pastel artists I didn't really know any better. It was the only pastel paper available at our local Michaels hobby store. I wanted to try pastels so I used my coupon to buy some paper and a small set of Rembrandt pastels. I wasn't very successful.

The pastels were hard and scratchy and my paintings  didn't seem as rich and vibrant as the pastel paintings I saw in books. Was it the paper? Was it the pastels? Maybe it was just me?  I needed to get some lessons and knowledge under my belt. And now 10 years later I understand I needed time to mature as an artist and understand my materials. Canson is now my friend. 

So what is the secret to success on Canson Mi-Teintes paper?


It turns out that the secret isn't just one thing. It isn't just the pastels we use,  it is also the techniques we use that make a difference. I was very lucky to have Marsha Hamby Savage as my first teacher. At that time Marsha painted often on Canson. In fact many of the first pastels painting demos I ever saw were Marsha's landscapes on Canson.  The techniques she used then are ones I return to often especially if I am working on Canson.

Secret #1   Make sure you have a plan for your painting.
Canson paper is unlike sanded papers in that it doesn't take as many layers of pastel. It is easy to fill the tooth of the paper which will lead to dull flat and muddy paintings. If you have a plan then you will not have to experiment on your painting. You will be able to make marks and leave them alone....leading to less layers. For today's painting I did a 4 value thumbnail sketch and a Notan (black and white) These were the blueprints for my painting. I had a plan!


Secret #2 Begin the painting with hard pastels.
This is common advice for pastel paintings. I don't always follow this advice but on Canson I will always begin the painting with a block in using harder pastels. I like to use hard sticks such as Nupastels or polychromos or cretacolors hard pastels. These pastels have more binder so the pigment isn't released as readily. The tooth of the paper isn't filled as quickly. For today's painting I did a value block in with just 5 Nupastels. I blocked in the darks, lights and most intense colors. This is a wonderful way to start any painting!


Secret #3  Use a Light Touch 
The right touch is always a light touch and this is especially true when working on a non sanded surface. Think of the pastel as a feather. If you press too hard it will bend and break. Light strokes will allow for more layers....even with the softest pastels. I began today's painting with hard pastels and a light feather touch. After the initial block in I switched to softer pastels such as Terry Ludwig pastels. As the painting developed and I got to my final layers I used a heavier touch. For example, the flowers were all painted with one layer.....one heavy single mark for each bloom with a soft pastel.

starting to add some softer pastel layers

finished!

close up detail

The secret to success on Canson or any non sanded paper is really a combination of the right pastels and the technique of applying the pastels.....hard to soft, light to heavy, start with a plan....are the three things that I have found to help me not just to tolerate canon but to actually LOVE it!
Explore these techniques further in my PDF demo on Canson available for $6 on etsy.http://etsy.me/1aMpVwU

About the painting:  12 x 16 on burgundy Canson mi-teintes paper, smooth side.
This is a landscape from my trip to Sweden. It  depicts a patch of Monk's weed or Bishop's weed in the shadows. Monk's week was in bloom everywhere. It is an invasive weed introduced by monks in the Middle Ages. It was used to treat arthritis and gout. It is in the carrot family so the blooms look a lot like Queen Annes Lace which is probably why I love it!

Painting Flowers with a Power Block-In

$
0
0

'Gently She Blooms'     5x7          pastel          ©Karen Margulis
sold

There is something about the color black. Using it makes me feel powerful. But how many times are we told not to use black in a painting....it is deadly or dull. We are told to use other dark colors but to avoid black. I am guilty of both following and sharing this bit of advice. Today I was in the mood to break some 'rules'. 

I used a black pastel and did a Power Block-in! It emboldened me. It made me fearless. It was a great way to start my poppy painting.


I started with a black Nupastel and a piece of light gray pastel mat 5x7. I lightly drew my flower shapes and then boldly blocked in the shapes with the side of my pastel. Big Bold black strokes! I sprayed the block -in with workable fixative and let it dry.


The dark block- in gave form to my flowers. All I needed to do was develop the form and add the middle and lighter values. I kept the beginning layers dark. I used a few dark value pastels from my set of Terry Ludwig darks (a must have)

Terry Ludwig darks


I continued developing the form of the flowers going from dark to lighter and warmer. I like the painting at this stage. I can imagine finishing it with a few simple stem lines. But I was committed to finishing the painting so I worked on a background.


The background is made up of strokes of bold color, all Terry Ludwig pastels. I wanted it to be green but a cooler green to allow the flowers to come forward. I then returned to the flowers and added the finishing marks....some bright red orange highlights and a touch of blue.


That was a fun way to start a painting. I'm going to call it a Power Block-in. It was liberating! It really changed my state of mind from unsure and tentative to bold and almost reckless....and that is fun!


Paint in One of my Favorite Places in US

$
0
0

'Take Me Back To Texas'               11x14            pastel              ©Karen Margulis
painting available $165
It was a place on my bucket list. I knew I would like it but I wasn't prepared to fall in love! It only took a drive into the countryside outside of Austin, Texas to know I would not only love it....I would be back! The Texas Hill Country during Bluebonnet season stole my heart!

Last April I was hosted by Marsha Young of the Butterfly Gallery in Dripping Springs Texas for a 3 day pastel workshop. The weather was wonderful, the Bluebonnets in bloom and everything begged to be painted. I was happy to share with a talented and enthusiastic group of artists. We learned a lot and made great memories.

I am happy to announce that I will be going back to this fantastic place next April! This time I will be team teaching with my good friend and fantastic artist, Marsha Savage. Marsha and I will be on a road trip on our way to Tuscon, Arizona for the Plein Air Convention. We couldn't resist planning a stop in Dripping Springs and Marsha Young was happy to host us again.

If you'd like to read a review of the last workshop visit my blog post (click here.) There is also a quick video of Mt Gainor Inn... one of the lodging choices and a painting location.

If the Texas Hill Country is on your bucket list consider joining us for up 3 day workshop next April. Details below.

April 9-11           'Painting the Texas Hill Country' team teaching with Karen Margulis and Marsha Savage
                            Dripping Springs, Texas

                            Saturday April 9 - Monday April 11th.

                            A  plein air workshop in the beautiful Texas Hill Country.
                            Paint the bluebonnets, wildflowers, barns and more!
                            Fee: $350. Lodging options in 2 local B&Bs are available.
                            contact Marsha Young for details and registration or you can register on
                            the Butterfly Gallery website here.


About today's painting: 11x14 on Uart 500. This was a demo painting for a private student. I began with a 4 value block-in with warm colors and did a dry wash. This scene was from one of the many photos I took  last April in Hill Country!

How to Move Beyond Local Color

$
0
0
'Time for a Change'            12x16              pastel               ©Karen Margulis  
painting available in my Etsy shop        $165


 We have heard it before. Value does the work and color gets the glory. This means that we should be able to use any colors we want in a painting as long as the values are correct. So we can have purple cows and blue trees and they will be recognizable if we have the values in the right place.

We may know this to be true but how come it can be so difficult to put it into practice? How come it is so challenging sometimes to move beyond the local color? Skies don't always have to be blue and grass isn't always green. Being bold and unafraid can help. Being willing to take risks and try unexpected colors is important. But it doesn't always lead to a successful painting.

There is more to moving beyond local color than just being unafraid of using color. We need to understand how to use colors that are harmonious and work well together.

value underpainitng with a 305 Nupastel and alcohol wash
 In today's private class we played with color. We took a marsh scene and moved it beyond the local colors shown in the reference photo. The marsh grasses were green. The sky was washed out. We wanted to make the colors interesting but still make sense.  It was time for a little color theory and the use of a color wheel.

We talked about the properties of color and the color wheel. We explored the idea of using color schemes for choosing our palette for a painting. We discussed the practice of 'winging it' for color choices vs. having a plan for color. Winging it is exciting and can be fun but it doesn't always lead to a successful painting.

Having a plan for color is the best way for success. Especially when trying to move beyond local color.  My favorite book on color is'Confident Color' by Nita Leland. It has a wonderful section devoted to the various color schemes that are possible. I love using this book to expand my palette and give me ideas for new color schemes. For today's demo I chose a Low Intensity Modern Triad. I liked this palette and will use it again. It is fun to find new ways to put together color!

The palette used for the painting 
 TIP: Choose a simple subject and plan to paint several versions using a different color scheme for each one. See how your color choices lead to very different results. Choose colors that you wouldn't usually choose.


A Great Resource for Successful Watercolor Underpaintings

$
0
0
'Doing the Dance'            8x10                pastel              ©Karen Margulis
click here to purchase $145
I never understood the allure of watercolor underpaintings for pastels. When I would try them the results were wimpy washed out blobs of color. I envied artists who had mastered the technique....artists whose underpaintings could stand alone as finished work. I decided that I just didn't like watercolor underpaintings. It was an excuse.

The truth was I didn't know how do create a successful watercolor underpainting. There came a time that I decided to conquer my aversion. I paid close attention to the masters of the underpainting. Richard McKinley was a great help to me. He told me that if I wanted to do better underpaintings then to just do underpaintings.....lots of them. And I was not to worry about putting pastel on them. Just practice, practice and more practice.

the watercolor underpainting on Pastel Premiere white paper

It worked! I still have room for improvement but I now embrace watercolor and love the effects I can get. I have written several blog articles about the watercolor underpainting process. I decided to put all of these articles together into one resource. I made a Readlist with them.

Readlists

What’s a Readlist? A group of web pages—articles, recipes, course materials, anything—bundled into an e-book you can send to your Kindle, iPad, or iPhone.  


If you would like to have the collection of blog articles on watercolor underpaintings all in one place click on the link below for my Readlist.


10 minutes to Better Paintings

$
0
0
'Pawley Impression'                5x7                 pastel             ©Karen Margulis
click here to purchase $45
Do you want to create more painterly paintings?  Would you like to become a more confident painter?   Do you have 10 minutes a day to spare?  When I was working full time I was lucky if I could find any time to paint but I could always manage 10 minutes. What good can 10 minutes of painting do? The paintings in today's post are all 10 minute studies. Read on to see how they can help.

'Sea Days'        5x7         pastel
"Simplification is about finding large forms or planes, not minutia."  Ann Templeton

I believe the key to painterly work is to learn how to simplify the subject. If we can distill the subject into a collection of simple shapes and start with a good abstraction, we can then decide just how much detail we need to put in.  If we get caught up in the details we tend to tighten up and we can easily lose the freshness. How can we learn to simplify....that's where the 10 minutes comes in.

 I find that the more time I spend on a painting the more details I add and the 'tighter' my painting becomes.  If I want a fresh and loose painting I will stop before I think I am done and then I evaluate how much more I need. At this point I only allow myself one mark at a time. I want to quickly determine the big simple shapes and design of the painting and block them in.  Simplifying things quickly isn't magic it just takes practice...lots of it.  If you can devote 10 minutes a day to doing a quick study....your ability to simplify and paint with a quick and sure hand will improve. Here is a suggested exercise to try:
  • Set up a small area with precut paper size 5x7 or smaller. You should have quick and easy access to your supplies.
  • Have a stack of references photos...you don't want to spend your 10 minutes looking for  photo to paint.
  • Set a timer for 10 minutes. Don't draw your scene with a pencil....block in your big shapes with a pastel or paint brush for oils/acrylics.  You will tend to fill in the lines if your drawing is to precise.
  • Don't worry so much about color for your 10 minute studies....go with you intuition and play with color. The idea is to simplify in these studies not match the color in your references.
  • At the end of 10 minutes STOP. Now look at your study and decide what you would add or take away.  Learn from each study!  Save them and use them for future paintings.

$45

I love doing these quick 10 minute studies and I know that I learn so much from doing them.  The more you do the easier it will be to simplify and to avoid getting bogged down with minutia!


Interpreting a Bad Reference Photo

$
0
0
'The Glow'                        16x20                 pastel               ©Karen Margulis
painting available $325
 I love a good bad photo. You know the kind of photo that has some good bones but has a few problems keeping it out of the family photo album. The bad photos make better paintings sometimes. Bad photos beg to be better. They free the artist to interpret...to make it personal.

Take today's painting. I was working from a bad photo. It was too dark. It looked like a night shot but I remember it being late afternoon. The colors were washed out and the composition/shapes were something to be desired.

the reference photo.....bad!
I began the painting with the idea that I would make it moody with a gray blue sky. I did an underpainitng with yellow orange and dark blues.

  • I moved the horizon up slightly to make room for some reflections.
  • I broke apart the big clump of trees making them into a more interesting grouping.
  • I added a smaller tree to the right for balance.
  • I decided I liked the block in color of yellow for the sky and water so I changed my color scheme.
  • The change in colors completely changed the mood of the painting but I like it better than the dark broodiness of the photo.
There is nothing like taking a bad photo and having fun making it into a more interesting painting!

A Tip for Adding a Pathway to a Landscape Painting

$
0
0

'Beyond the Dunes'          8x10             pastel                ©Karen Margulis
sold
I discovered a pathway to the sea. It was hidden by the bushes and brambles of the shore but I pushed aside some foliage and the path beckoned. The distant sea glimmered with light breaking through the parting clouds. The storm had passed and I needed to discover the treasures along the shore.

That is the story behind today's painting. My reference photo for the painting was taken many years ago on a Spring visit to the Outer Banks. But the memories are vivid. Painting from these memories never get old. Each time I resist a favorite scene I return with more knowledge and improved skills.

This time I painted the path to the sea but I decided it needed a figure....to complete the story but also to complete the composition. The path needed a reward at the end.

closeup of the figure in the distance

'The eye should not be led to where there is nothing to see'   Robert Henri

This is one of my favorite quotes. It guides all of my landscape paintings. How often do we paint pathways or roads or waterways with no regard to where they take the viewer? There needs to be a reason for going down the path....something interesting to discover....It doesn't have to be a thing. It can be a spot of color, an interesting mark, texture, a bit of contrast. Eye candy. Something to savor and enjoy or maybe just something unexpected.

I decided my painting needed a small figure at the end of the path. The figure is a small surprise but also finishes my story. All it took was three small marks of pastel to suggest the figure but is is enough. 


the underpainting.....just 4 values of yellow
P.S.  Remember that pathways are not always a physical path or road or waterway. We create visual pathways with the arrangement of shapes and lines and edges in a painting. The eye will naturally follow these suggested pathways so make sure they lead somewhere! (and not right off the paper)

Painting a Sea Gull

$
0
0
'Meet Me on the Boardwalk'             5x5             pastel              ©Karen Margulis
purchase painting here $50
Enjoy this recycled post!

Sometimes the painting just paints itself. Sometimes it is a struggle. I painted some Arctic Terns the other day and everything flowed. Every mark was the right one. I had so much fun I thought I would paint a Laughing Gull for today's demo. It wasn't as easy as the terns! At one point I brushed out my gull and started over. Sometimes it's the best choice.


I am using a 5x7 piece of Pastelmat paper. I love the way the pastels go on this paper. It doesn't seem toothy but it really holds many layers.  I like it a lot.


I do the initial drawing with a piece of compressed charcoal.Because I didn't want my gull to be tiny I decide to let his tail go off the paper. I may decide to crop to a square so I draw a line to indicate the square.


My pastels are in a butcher tray. They are from my weekend paintings but looked like they would work for the gull. I add a few grayed purples. I have a mix of Terry Ludwig, Diane Townsend and Mount Vision pastels.


I start the painting with the plan to make a value map. I block in all of the dark areas first. I also start the background with a middle dark purple and a bright yellow.


Next I put in all of the lightest areas. I don't use my warmest, brightest light pastels. I want to reserve them for the ending marks. I pick pale values of purple,  blue and yellow.


Now I fill in the gull with some middle and middle light values. Everything has one layer of pastel. Next it is time to refine the gull and add details.


I decide to work on the background some more. I want to keep it loose and suggestive of  boardwalk.


I continue adding color to the gull. I add the lights. Something is going wrong. I have lost the shape of my bird. I could keep adding pastel layers to try to fix the shape and get the right lighting.....but the more I add the muddier I make it. It is going to be overworked if I don't stop.


Sometimes it isn't about adding more to fix problems.....sometimes it is about TAKING AWAY. So I take out a brush and brush off the gull. Goodbye gull.


I have a ghost image of the gull in place. I use my compressed charcoal to redraw my gull. This time I make him smaller. As I add pastel he will grow so I will start smaller this time.  With the drawing in place I repeat the above steps....darks, then lights, then middle values. I finished with the details of the eye and some spices of pure color.


I am finished. I am trying to decide if I want to leave it as a 5x7 which shows more boardwalk or as  a 5x5 crop? One shows the gull and his environment whereas the crop is more about the gull. What do you prefer?

The Best Small Plein Air Kit Ever!

$
0
0
'The Race'              11x14               pastel                ©Karen Margulis
purchase on etsy $100
 I had good intentions. My plan was to blog during my Caribbean cruise last week but as you may have noticed I didn't meet that goal. It must have been the hot sunshine but I somehow became totally useless. I parked myself on a lounger or floated in the sea all day long for seven days. I did manage to walk everyday and I did manage to paint a few minis. But I didn't do as much painting as I had planned. I probably needed the break. Sometimes you need to just empty your mind so it can be refilled!

I am home now. The laundry is in and I am back at the easel. I am refreshed and revived and full of exciting plans for the Fall and into 2016. There are a lot of things in the works that I will be sharing in the coming days. But first a quick review of the plein air kit I took on the cruise.

My 'Plein Air Lite' Kit
It has taken some time to tweak my set up but I am happy to report that I now have the best set up for traveling light with pastels. I call this my 'Plein Air Lite' set up. It is good for the times when you don't want to bring a lot of equipment but want enough supplies to paint some smaller pieces. I don't use an easel or tripod for this set up. Here are the details:
  • I am using a Heilman single sketchbox. This has one side for pastels and a kickstand so you can use the other side of the box as an easel. It holds paper up to 6x8.
  • A small piece of foamcore for a backing board along with some small bankers clasps
  • small pack of baby wipes
  • small micro fiber dishtowel
  • 5x7 portfolio folder for papers and finished paintings
  • small 4x6 $1 photo album for mini paper and finished paintings
  • softside lunch box with zipper and handles.....this is the best part! All of the supplies including the Heilman box fit perfectly inside the lunchbox making it a breeze to pack!


In the above photos you can see the set up at work. All I have to do is find a flat surface....in this case my lounge chair....open the lunchbox and the Heilman box and start painting. Clean up is easy with the wipes and the towel protects the chair. Finished paintings are stored in the photo album and placed inside the pocket of the lunch box. Easy, compact and light!!

Painting on a cruise ship and exploring caribbean islands as an artist is a great way to escape the upcoming winter. I still have a couple of openings for my February Art Cruise. All artists will get a plain air lite set up (excluding the Heilman box and pastels)  Details of the cruise can be found here: http://kemstudios.blogspot.com/p/pastel-classes-and-workshops.html

IAPS Convention 2015 Wildflower Demo #1

$
0
0


'Emergence'             16x20           pastel            ©Karen Margulis
painting available here $350
The boxes sat in the corner of my studio. They called out to be unpacked but I wasn't ready. I had just returned from almost two months of travel and was in the middle of planning for my fall classes. I didn't have time to open the boxes...even though I was curious.

Today I finally had a chance to open them and I would like to share the contents with you. The boxes contained the demo paintings I did at the IAPS convention in June. It was an amazing convention and I was honored and thrilled to be a part of it as an instructor. I did two presentations at the convention....a 3 hour demo on wildflowers and a 3 hour seminar on blogging for artists. I had a wonderful time sharing with artists who are just as passionate about pastels as I am.

During my wildflower demo I did three large paintings. In this post I am sharing my second demo....daisies done with a watercolor underpainting. I used Cretacolor aqua bricks for the underpainting and the painting is on Pastel Premier white sanded paper.


Group shot of the IAPS Master's Circle recipientsI was also honored to receive my Master's Circle medallion at the banquet. What a fantastic group of artists to share this honor with! We were all like kids as we received our award and cheered one another. It was an evening to remember!

Group shot of instructors and demonstrators


closeup detail of painting

I will be sharing the other demo paintings in upcoming posts. The convention was an amazing experience and I encourage you to make plans to attend the next one in June 2017!
Here is a report of the convention that you might like to read:

http://www.artistsnetwork.com/medium/pastel/iaps-convention-2015-the-greatest-pastel-party-on-the-planet


Join Me and Paint in Croatia July 2016!

$
0
0

'Along the Coast'         5x7             pastel              ©Karen Margulis
available $50
Painting My World. It is the name of my blog but it is also a dream come true. I have always wanted to travel. From the time I took a job in high school so I could go to France with my French class I was hooked. The travel bug had bitten and there was no turning back.

Painting and teaching has helped me make my dreams of traveling the world a reality. This year it was France, Sweden and Finland and next year it will be Croatia! I am excited to announce that I will be teaching a 7 day workshop with Aria Workshops in Istria, Croatia. 
Here is an excerpt from the website:

"Join us for a painting and sketching holiday on the greenest part of the Adriatic sea. Enjoy delicious Mediteranean cuisine, delightful wines and the camaraderie of fellow artists. The workshops are based in Poreč, a small picturesque resort town in Istria. You will be staying in the Hotel Villa Gloria, a family owned and operated hotel with exceptional service. There will be painting excursions to the Istrian hill cities, to Pula, the city with the Roman amphitheater, and to the Rovinj where every street and stone calls to be painted.There will also be an optional one day excursion to Venice, Italy"


I've seen the photos and I am excited by the painting possibilities of this beautiful part of the world. This trip is an opportunity to learn and grow as an artist as well as expand your horizons and make new friends.

The dates of the workshop are July 2 - 9, 2016. Details as follows:
If you are interested in this workshop, please register here and we will contact you with more information shortly.

Total Workshop Prices (7 days, per person)

sharedsinglenon-artist (in shared room)
Workshop930 €990 €430 €
Villa-Gloria560 €700 €560 €
Total1,490 € 1,690 € 990 € 

The workshop fee includes:
  • Trips around Istria (meals included).
  • Airport pick-up/drop-off.
  • Ground transport where we go as a group.
  • A dinner in a local restaurant.
  • Teacher tuition.
  • Field easels for your use during workshop.
  • Drawing boards, masking tapes, scissors, knifes, vine charcoal, wet wipes…
Not included in the price:
  • Airfare to Croatia
  • A boat trip to Venice (€75) – whole day. If you are not interested to go to Venice, you can stay at villa and enjoy all meals with no extra charge.
  • Airport pick up if you can’t arrive with others in the group.
  • Drinks in villa Gloria that are not taken with meals.
  • Drinks on excursions.
  • Transportation and meals if you decide to take a day off and explore Istria on your own.

Cancellation policy

€200 deposit is non-refundable.
If you paid the whole amount but canceled 61 or more days prior to the event, the whole amount minus the deposit of €200, will be refunded.
In the case when a teacher cancels the workshop, the whole amount will be returned.
Cancellations received 60 or fewer days before the departure will result in a loss of all monies paid, but a friend of yours can come instead.
No refunds for services not utilized while on the workshop will be provided.
All cancellations must be sent to aria.workshops@gmail.com, and will be effective on the received date.

A Foolproof Way to Choose Underpainting Colors for Your Paintings

$
0
0
'Meadow Dreams'         18x24              pastel with pink underpainting             ©Karen Margulis
purchase painting on etsy $350
 You've probably heard it before. There is no right or wrong choice when it comes to selecting underpainting colors. That is both comforting and scary at the same time! Imagine facing that big piece of blank paper. It is waiting for you to get started. You need to put down something....but what?  You can't really make a wrong color choice.....or can you?

I have learned through a lot of trial and error that while there is no right or wrong color choice for underpaintings....the colors you choose do have an impact of the final painting. Color choice does matter. It effects how the subsequent layers appear. It can change the whole mood and tone of the painting.

After many many paintings I find that underpainting color choices have become fairly intuitive. But sometimes I just want to be sure without making a big commitment of paper. 
I don't want to experiment with color choices on a good piece of paper! So I resort to a foolproof method....taking color notes.


The plans for my poppy meadow series

Color notes for the paintings. Top colors are final layer choices. 


Color Notes are quick and easy to do. It is just a matter of trying out potential color choices on a small piece of scrap paper. It is so much easier to see a variety of choices together. You can then choose the color combination that best suits your goal for the painting.  Here are some tips:


  • Use the same type and color paper for both the color notes and the painting. The colors will look different on other papers so this is important!
  • There are three parts to taking the notes....part one: choose the underpainting colors and make some small squares. Part two: choose the colors that you might use for the final layers (often the local colors) Part three: Make the underpainitng squares again and this time lightly layer the final layer color on top. Now you can see and judge how the colors work together.
  • Often I like to keep things simple when choosing underpainting colors and select ONE color with FOUR values of the color. So my color notes include a dark, light, middle dark and middle light values. I used this method on all three poppy meadow paintings.
This is a foolproof way of choosing underpainting colors because you can see the results of your color choices on a small scale with little effort and expense. You can quickly try many combinations without wasting your good paper on experiments. You do your 'what ifs' on scrap paper!


'Wandering Through the Poppies'              18x24               pastel with purple underpainting     IAPS demo    
 available $350
'Poppy Walk'               15x21             pastel with yellow underpainting             available  $250
The three paintings shown in today's blog are the result of using Color Notes in the planning stage. Each painting was done using the same colors. The Underpainting colors are the only thing that is different for each one. I was able to judge my results with the small notes before I committed to the big piece of paper. You can see that each underpainting choice resulted in a sublet but different feel to each painting. All paintings on Uart 500 with a mix of Mount Vision and Terry Ludwig pastels.

Something New....Trying Cobra Water Mixable Oils

$
0
0
'Sunshine'              5x7        oil on panel          ©Karen Margulis
available $95 click here to purchase
Sometimes I wish for more hours in a day. There is so much yet to discover about art....new materials, new mediums, different subjects. I want to try it all! I am finally making time to explore oils. I tried a few years ago. I enjoyed painting with a brush but found clean up a pain. Since I was teaching pastel classes in my studio I couldn't leave the oils out. As you know....out of sight can lead to out of mind. I didn't follow through with the oils and they sit on a shelf.

But they weren't too far from my mind. A discussion with a friend about Cobra water mixable oils by Royal Talens got me thinking. If I only needed water to clean up it would be easier to manage both the oils and the pastel classes. So I treated myself to a few tubes of paint and the recommended brushes.


Today I had some time to play. I took out a 5x7 panel and squeezed out a limited palette of yellow, red, blue and white and set to work. I decided to paint some sunflowers. From the first brushstroke I was impressed. It felt great. The paint was rich and buttery. I was able to thin it with water to create a wash/block in. I finished with some palette knife petals. Rinsing the brush in water was so easy and it helped me keep the colors fresh.

I enjoyed my painting session and I am anxious to paint some more!  I will give a more detailed review of the paints as I spend more time with them. Visit the website for more information:
https://www.royaltalens.com/products/water-mixable-oil-colours/


close up detail


Art Inspiration from Yoda

$
0
0
'Just in Time for Bluebonnets'               5x7            oil on panel            ©Karen Margulis
purchase this painting on Etsy $95
A new adventure is unfolding. I have painted my third small oil painting. One a day for three days. I didn't really start with a goal in mind. I just wanted to try the Cobra water mixable oils. But it is slowly calling me to do more that just try. It reminds me of one of my favorite quotes...from Yoda of Star Wars fame.

'Do or Do Not. There is no Try.' Yoda

I have it posted in my studio. I helps me stay focused on whatever I am working on. It reminds me that if I really want to get better at anything I work on, I have to give 100%. I have to do more than try. I have to Do.

Doing has worked for me in the past. When I wanted to get past the learning curve with pastels I made the commitment to paint every day. It worked. Now I am facing a new medium. I have tried it in the past but never fully committed to it. I painted a few and put the oils away.  I didn't work hard enough at Doing. I didn't make time to practice.

the photo references used for the painting
Is it now time to make that commitment? With the water mixable oils it sure is easier to work on a daily small painting and still have time for pastels. And I do know that the more I paint the faster I will get past the oil learning curve. It will begin to feel less frustrating! I believe I will take up Yoda's advice once again. I hope you will enjoy seeing my oils as well as pastels!

What is it that you would like to do better? Make the commitment with me to work harder at DOING and not just TRYING!

Pastel Demo: Florida Wetlands with Reflections

$
0
0
'Another Quiet Morning'             12 x 15 3/4'             pastel             ©Karen Margulis
painting available on Etsy $165
It's funny how a picture just calls out to be painted. I was in the middle of several projects and going through my reference photos. One just stopped me in my tracks. I had to paint it and it couldn't wait. It has been awhile since I did a step by step photo demo so I kept my camera handy while I painted this one. Enjoy the progress shots and my commentary.


I am using a piece of white Pastelmat 12 x 15 3/4. I begin the painting with a quick drawing laying out my big shapes. This is a scene from a central Floirda wetlands and there are a lot of marsh grasses. My challenge will be to keep them simplified.


Next I block in the big shapes with some dark, light and middle values. I chose colors that were close to the final local colors. Underpainting colors are fun....sometimes I go with value or maybe bright colors or complements....there are so many choices. Today I felt like keeping it close to the local colors. I use a mix of hard and soft pastels. It is more about the right color and value.


I decide to wet the pastel with water to make a soft and dreamy underpainting. Since I am painting a lot of water and reflections, the wet underpainting gives me a head start. I use a soft wide brush. Pastel mat absorbs the water so you don't get the rips that other papers allow but I still like the soft underpainting.


Once the underpainting is dry I block in the darkest areas of the painting. I use several colors all the same value. I am using Terry Ludwig pastels with a few Unison and Nupastels.


Next I move onto filling out the trees. I use several greens to flesh them out and give them form. I  pull the tree colors down into the water. I also pull some lavender over the reflections to start the feeling of mist.


Once all of the trees and grasses are blocked in I paint the sky. I choose a pale yellow to represent the early morning light. I also put the same yellows in the water. At this point I was too involved in the painting to remember to take a photo! But it was just a matter of refining the painting and choosing where I wanted to put the most clarity and focus. I added tree trunks, sky holes and grass blades. The finishing touched were the current lines in the water.


Finished! I always forget how much I enjoy working on Pastelmat. It really allows for a bolder mark-making which I love.  Below is a close up of the grasses and current lines.


If you like this mini demo please share it with your friends! Click on the share buttons below!

Why I Love Taking Art Workshops

$
0
0
'Indian Paintbrush Study I'      5x5          pastel          ©Karen Margulis
click here to purchase $50

I guess I am just a perpetual student. I love to learn new things. I am happiest with my nose in a book or listening to a good lecture and taking notes. Maybe that is why I also love teaching. It gives me the chance to be creative with the information I share and design workshops that lead to lifelong memories! This week I am preparing for several upcoming workshops so I thought I'd share my thoughts on why taking workshops is a good thing.

One of the things I love about painting is that artists are never done learning. It is not something we totally master. We may develop technical skills but there is always room for learning and growth. I like to take workshops.  I choose my workshops carefully and make sure I don't take too many too closely spaced. Time is needed to digest what is learned. Too much information from too many sources can be confusing. But chosen wisely a workshop can have many benefits.

All my gear! Packing is different for a studio workshop when I have my car than flying to a plein air workshop.
  •  A workshop exposes us to new ideas and techniques which can lead to new discoveries even for the most experienced artist.
  • We often learn just as much from the other artists in the workshop. I always learn tips from my fellow artists...not to mention meeting new friends who are as passionate about painting as I am.
  • It's good for your brain!  It is important to go back to learning mode every once in awhile. Hearing things you know explained in a different way can lead to breakthroughs and aha moments and we are never too experienced to have those!
  • Workshops can be a time of forced immersion in art. Sometimes life gets in the way and we don't get to paint as much as we want. A workshop gives your days of uninterrupted painting time. It can really jumpstart a good routine.
  • Workshops help me learn how to be a better teacher. It is humbling to be a struggling student...going back to that place helps me understand my students and what they are feeling in my classes.
  • Workshops lead to lifelong friendships and memories. These experiences add to the fabric of our experiences. The more we experience the richer we will be and the better we will be able to express ourselves through our art.
If you are considering a pastel workshop this year or in 2016 have a look at what I have planned. Perhaps something will speak to you. A Caribbean cruise....Texas Hill Country...Croatia and Venice...

I'd love to have to join one of my workshops! Details of each workshop at this link: http://www.kemstudios.blogspot.com/p/pastel-classes-and-workshops.html


Art Inspiration from Finland

$
0
0


'The View from the Summer House'            5x7             oil on panel             ©Karen Margulis
purchase painting on Etsy $95
 Was it Finland that inspired me to pick up a paintbrush? Annika was right. Finland and my new friend Heidi had something to do with my new adventure with oils. Heidi Hjort was one of the Finnish artists who took my workshop this past summer. She wanted to join us but she painted with oils. I was happy to have her join the group. After all oils and pastels are very close related and she would hopefully still learn something.

The evening view

In the end, as it always is, we all learned from one another. It was an amazing experience. A multicultural potpourri of art spirits from Finland, Sweden, Germany, England and the US. We were hosted with warmth and great care by Annika Ostman....a fantastic artist and now friend, at her summer house in Asklat, Finland.

The summer house sat at the edge of the Baltic Sea and provided an always changing view. I painted the view many times and I know it will become one of my favorite motifs much like the marshes of Stan Sperlak's Crow Creek. More on the workshop and the summer house tomorrow.


Heidi and Satu painting at the summer house

What did Heidi have to do with me picking up a paintbrush? She was that little push that told me I needed to try it again. She was painting lovely work and seemed to be so in tune with the paintbrush. I wanted to experience that as well. I have done 4 daily paintings so far and I have a long way to go but I will always remember my special time in Finland and the effect it has had on my art spirit. Tack Annika and Heidi! (and all of the wonderful artists in our group!)

Heidi writes a wonderful art blog and I invite you to check it out. Today she shares a post about one of her favorite artists, Bato Dugarzhapov. Check out her blog and the links to Bato's work:

 http://heidihjort.com/2015/09/15/learning-from-a-master/ 

hard at work...summer 2015


How Weather Changes a Plein Air Painting

$
0
0
'Summer Will Come'           8x10         pastel plein air study              ©Karen Margulis
purchase $125

Time is not always on our side. Especially when painting en plein air. When we paint outside we become a part of the very subject we are trying to capture on canvas (or paper). We are at the whim of Mother Nature. We have to deal with bugs, heat, cold, wind, rain to name just a few challenges faced by the intrepid plein air painter. Weather is a big challenge.

Weather is a challenge but it also influences the paintings we create. Challenging weather conditions can cause us to paint faster....and faster is sometimes better but it is always much different than slow.

I prefer painting quick small studies on location....field studies. I work fast trying to capture the essence of the scene. Like taking notes. So I embrace challenging weather.  It forces me to work quickly.  And I notice something in these fast weather driven paintings...they are fresh and loose and truly capture the feeling of the moment.

Take the paintings shown in today's post. They are all painted during my week in Finland all at the same spot. The only variable was the weather. They are all 8x10 pastels. Let's compare:


The painting above was painted as a demo in about 10 minutes. The goal was to show the class how I like to work to quickly to capture the feeling of the scene. I was drawn to the brightness in the sky that had suddenly appeared to break up the overcast sky. I had to work quickly to capture this shaft of light. Everything is just a suggestion. There is very little details in the trees. The main thing I wanted to remember was the shapes and colors. 10 minutes was enough to capture this. And it was a good thing because it quickly changed and the light was gone!

'Summer Study Finland'         8x10          $125

The painting above is the same location with a sightly different point of view. The weather was different this time. It was overcast with a gray sky filled with light clouds that were rolling and changing quickly. It was also windy. I wanted to capture the feel of the wind. I had more time to play with since there was no strong source of light. Conditions were constant....overcast and wind.
I spent more time on this painting. (maybe 30 minutes which is long for me)  I concentrated on the trees and grasses. Since conditions were constant I had more time to develop them in greater detail. I added the bright spots on the water since it was also agitated by the wind.

The weather conditions gave me more time and so I took more notes!

'Summer Study 2 Finland'            $125

In the last painting time was on my side. I was in the land of the midnight sun so the magic hour lasts for hours! The sun didn't set until around 2 am. Normally to capture a sunset we would need to paint quickly. For this painting the sunset conditions remained the same for hours! It was also very calm and still. I had more time to work at a slower pace (although I still chose to work quickly 30 minutes) But if I wanted I could have painted larger or painted a more developed painting.

Often we struggle with plein air because we try to do too much and we fight the weather conditions. Let the weather dictate how you respond to the scene and think about simply taking notes in paint when the weather isn't cooperating!

Viewing all 2266 articles
Browse latest View live